It’s hard to oversell the significance of your bike’s rear shock. Here’s what you should know about it…
Words: Big Mac Pics: Mortons Archive
Suspension: it’s not the first time we’ve looked at it and it won’t be the last, because plays such an important role in a bike’s overall dynamics. For this instalment of What The Tech?, we are looking at rear suspension – and not just the rear shock absorber itself, as there are other factors that fall under the all-umbrella cover of rear suspension, and there are factors that can affect it… swingarm length, swingarm pivot position, linkage, the type of shock absorber, and even how gearing and where the position of the front sprocket can affect how the rear of a bike behaves.
Enjoy everything More Bikes by reading the MoreBikes monthly newspaper. Click here to subscribe, or Read FREE Online.
Of all the performance upgrades available today, suspension is probably the most effective. It’s certainly the best-value upgrade to your bike if all you do is just take some time to set it up because that’s free. At the most extreme end of the scale of investment, replacing a standard shock absorber for a premium aftermarket one will still cost less than a full exhaust system, yet suspension adjustment or upgrade is generally avoided. This is possibly due to the air of witchcraft that comes with it, which is not unreasonable.
When you take ownership of a bike, brand new or used, you must assume that the suspension isn’t working as well as it can. In the case of a used bike, it’s just good practice to assume that the previous owner(s) have ballsed it up, and even if the bike has never had its adjusters touched, they will by definition still be on standard settings, which isn’t necessarily a good thing.
For motorcycle manufacturers, it is an unfortunate fact that their customers are human beings who, annoyingly, are all physically different. This means they need to design a bike that from the showroom will behave just as predictably and safely for a 70kg racing snake as it does for a 110kg lump, with a pillion and some luggage. They must sell their bikes with a suspension set-up that is all things to all people – there are no exceptions to this. For this reason, I’ll never stop my crusade to encourage people to dive in and explore the world of suspension for a better understanding of the benefits – even just taking some time to check and set up your bog-standard suspension, but that’s for another day.
The basics: how rear shock absorbers work
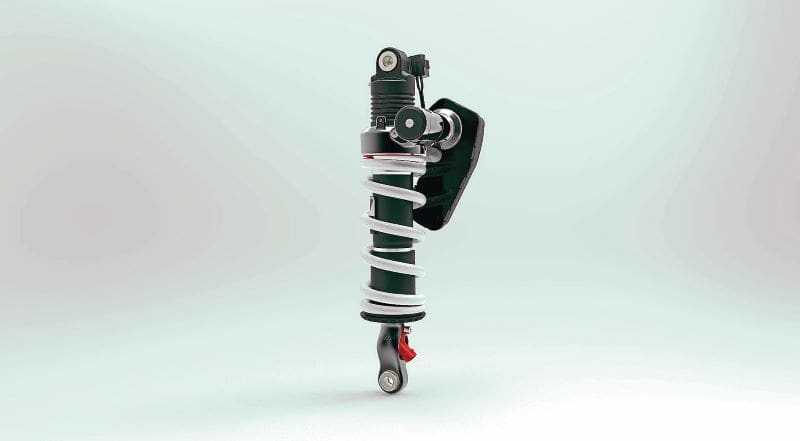
It is always worth reminding ourselves that the basic principle of how a rear shock absorber (and set of forks) works is very simple, regardless of price tag. There is a spring to absorb bumps, support the bike’s weight and control its weight transfer, and there are dampers that use oil to control the springs’ behaviour to make it less springy… less like a pogo stick. There is one exception to this, which is ‘active suspension’. It is entirely hydraulic, so doesn’t use a spring; it is also non-existent in motorcycling so not even relevant, but it gets a mention due to often being mistaken for the latest generation of electronic suspension we are increasingly seeing on production bikes. By virtue of having springs, but also by having damping that is electronically controlled, what we see on motorbikes is technically semi-active, not active. So, on the basis that there are only two elements to a suspension unit – a spring and a damper, the truth is there are only two things you need to understand, because there are only two things you can alter on any suspension unit: the spring and the damper. Other factors can indirectly alter suspension behaviour, but they aren’t directly part of the suspension set-up.

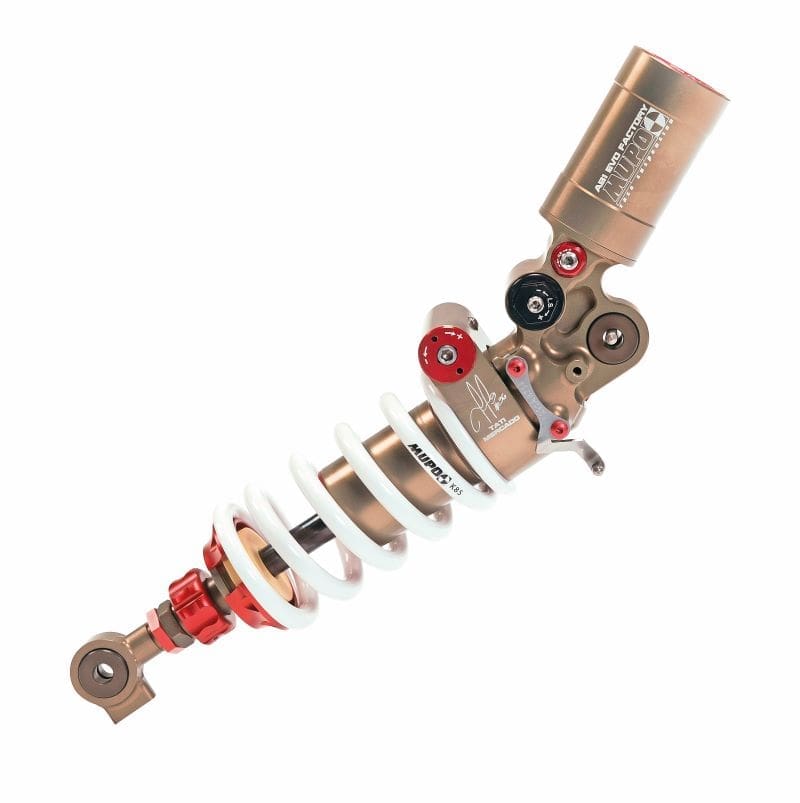
Preload is the adjustment to the spring that ‘preloads’ enough tension to support the weight of the bike and set the sag. If the spring is the right weight for the bike, then it just needs preloading a moderate amount. If the spring isn’t man enough, then it’ll need preloading more to add more tension, and vice versa. A common mistake is thinking that adding preload to a shock or fork stiffens the suspension; not true. All it does is continue to add tension into the springs, which in turn extends the suspension and reduces the amount of movement it can have. It’s possible to go so far that you alter the ride height of the bike, which will affect its handling. Stiffer springs, often referred to as ‘heavier’ springs, are the only things that can increase the stiffness of suspension.
On the subject of springs, there’s a bit of jargon surrounding them. A single rate spring, also known as a linear spring, has the same ‘spring rate’ (usually measured in N/mm) throughout its entire stroke, whereas a progressive spring has a softer rating for the first part of its stroke and a stiffer rating for the later part of its stroke. The linear spring will have the same coil spacing over its full length, and the coils on a progressive spring will be tighter at one end than the other. Progressive springs are a nightmare to set up given that, by their very nature, their properties constantly change. However, for everyday commuting, touring or off-roading, they make a strong case by virtue of the first part of the stroke being soft for comfort and the later part being firmer for if/when you want to take a pillion, for example.
Getting a consistent sag setting and damping settings are actually impossible on a bike with a progressive spring set-up. Track riding or even spirited road riding really needs consistency and good support at the first pull of the brake lever, so single rate springs are the go-to for anyone who wants to go even moderately quick.

How to mount a rear shock to a bike
There are two ways a rear shock can be mounted to the bike, either directly from the chassis to the swingarm as per the Aprilia RS660, for example. This is a single rate set-up and will use a progressive spring. The other way is called a rising rate, which connects the shock to a linkage that converts the linear movement of the swingarm to a non-linear movement at the shock for the same effect as a single rate set-up with a progressive spring. So, why not just use a single rate set-up with a progressive spring? The rising rate set-up does the same thing using maths and leverage rather than physics and brute force, which means sag and damping settings remain consistent throughout the stroke of the shock, even if its movement isn’t linear with the movement of the rear wheel/swingarm.
As with everything to do with suspension, there are compromises for each set-up. Single rate set-ups are cheap to make and easy to maintain. Rising rate set-ups can use shock absorbers with much shorter strokes, so can be packaged much more neatly on bikes that have increasingly less space, but they are complex, need maintenance and are expensive to produce.
Sag is the amount of preload applied to the spring at a standstill, either by the bike’s own mass (static sag) or with rider and pillion/luggage (dynamic sag). Measured in millimetres, it’s the start point for suspension movement – you want enough compression to deal with bumps, braking and cornering forces without reaching the bottom of the stroke, but also enough extension left for the wheel to drop in to bumps in the road and maintain contact under acceleration. It’s adjusted via preload adjusters or, on old suspension, spacers. A surprising number of riders will spend forever adjusting damping, creating more problems rather than making improvements when most of the time, setting the sag and getting the suspension working within the correct range can bring a bike to life.

It’s no coincidence that, without exception, every bike I ever ride for a magazine feature gets its suspension sag checked by me – I keep a tape measure and tyre pressure gauge permanently in my rucksack. The difference in getting sag right can transform a bike, even a brand-new immaculate press bike. It takes just minutes to check and adjust, if needed and if, like me, an opinion needs to be formed, or if as an owner the bike is probably going to be part of the family for some time, it just makes no sense to not check that the sag/preload isn’t right.
Compression damping is the adjustment that controls the rate that the spring compresses under load or over bumps, usually done by preloading a small spring on top of a shim stack with tension to lift them or lower them, which in turn makes the passage of oil easier or difficult. More damping means a slower rate of compression and less means a faster rate. Too slow and the spring cannot react to the input quickly enough; too fast and the spring effectively collapses without supporting the bike. Some bikes have high-speed and low-speed compression adjustment: high-speed for managing bumps and low-speed for managing weight transfer of the bike under braking, acceleration or cornering. The compression damping adjuster is usually found at the bottom of the shock absorber. Adding lots of compression damping will make the suspension feel like it is stiffer, but the reality is that the spring is just being so heavily damped that it can’t move, which is not actually stiffer suspension. Only stiffer springs will make suspension stiffer.
Rebound damping is the adjustment that controls the rate that the spring returns from being compressed or how quickly it extends into bumps. Too fast and the bike will take too long to settle after a bump and become unstable if more bumps are hit, or if traction is lost under hard acceleration, the bike will struggle to regain grip due to the shock ‘pumping’ or extending too fast, adding further momentum to the sliding rear tyre. Too much rebound damping and the springs cannot recover from being compressed in time for the next compression, until eventually the shock momentarily runs out of range and locks solid, sometimes referred to as ‘ratcheting’. The rebound damping adjuster is usually found at the top of the shock.
Assuming that the correct springs are fitted with the correct sags, rebound damping is the adjustment that will have the biggest influence on how a bike behaves. Even if the springs are the right weight and the sag is perfect, the bike will still feel terrible if they are allowed to release too fast or too slow. Some manufacturers will refer to rebound damping as ‘tension’ on their adjusters.
The common unit of measurement for damping settings is ‘clicks’, or ‘turns’. Some systems will have a noticeable ‘click’ as you turn the adjuster, which you can count, and some don’t, so you must count the complete turns of the screwdriver or Allen key you’re using. The starting point is ALWAYS with the adjuster turned fully clockwise (closed). In the case of a system with clicks, turn the adjuster clockwise all the way until it won’t turn anymore, then back anti-clockwise to the first click; this is actually the fully closed position. It is from this position that’s the starting point whenever anyone refers to clicks or turns of damping.
It’s really important to know what the full range of damping adjustment is, so once you find the fully closed position, it doesn’t really mean much if you don’t know what the fully open position is. If you have made a note of how many clicks/turns your current setting is by counting them on the way to the fully closed position, it doesn’t mean much if you don’t know out of how many clicks/turns that is. For example, if you have counted 10 clicks, that could be out of 30 (quite a lot of damping) or it could be out of 12 (not much damping), which will make a big difference in your decision-making for which direction you might like to try adjusting. If you don’t make a note of the settings your bike was on before you started, don’t panic. Just put the adjusters somewhere in the middle of the available range and you won’t be far off what the manufacturer did when the bike was new.

Ride height is usually a nut at the bottom of the shock absorber that either extends or reduces the overall length of said shock absorber, and in doing so either raises or reduces the height of the rear of the bike. None of the shock absorber’s damping properties are affected as this adjustment is only changing the bike’s geometry. A raised rear end will make the bike turn faster and hold a line with less effort but won’t be as stable under heavy braking. A lower rear end will make for greater stability under braking and cornering, which is why manufacturers usually play it safe with ride height settings. Raising the rear ride height changes the weight distribution, so sag settings will need to be re-checked. The effect of raising the rear can also be achieved by lowering the forks through the yokes, but ground clearance can be reduced by doing it that way.
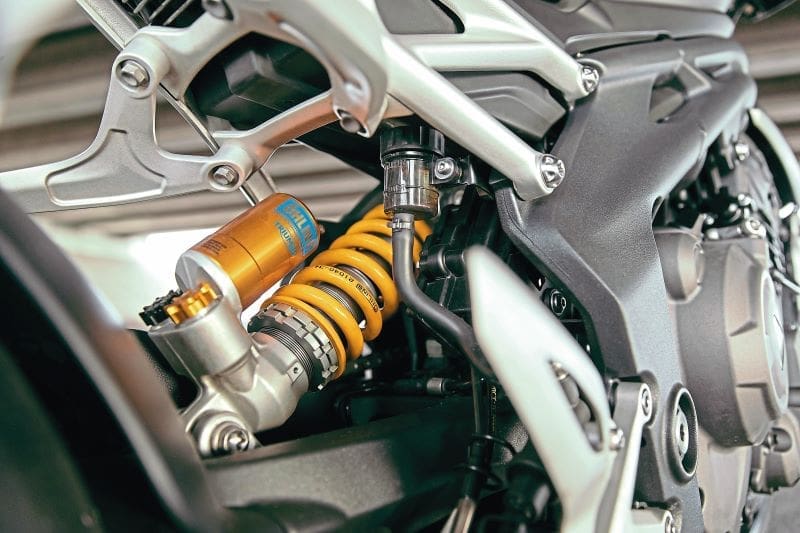
The types of rear shocks
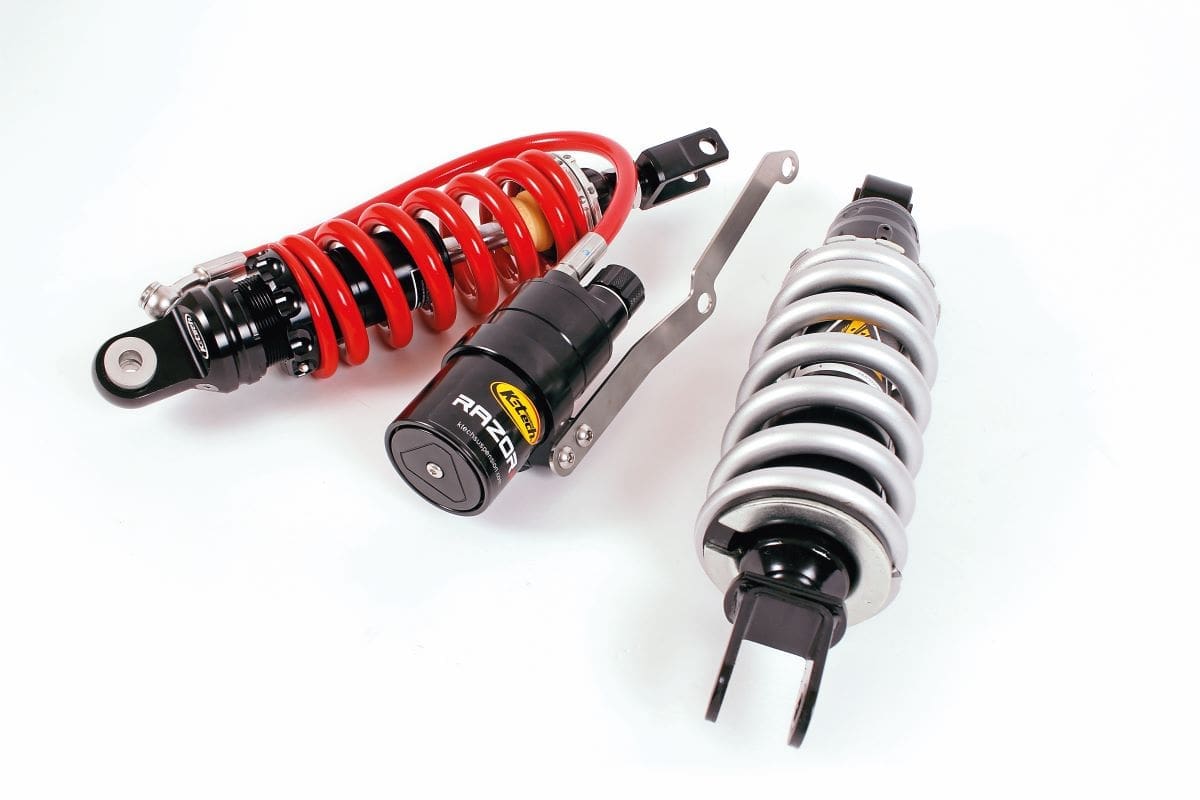
We covered off the main differences in the types of rear shocks in May’s Fast Bikes as part of the options available for the Bathams Racing Yamaha R7 project, but the brief version is that a normal mono-shock uses, as mentioned, a stack of shims which, depending on how much tension is applied to them via a spring controlled by an adjuster, determines how freely the oil can pass the piston and thus the damping characteristic.
A ‘twin tube’ shock absorber uses a second chamber or ‘tube’ around the outside of the main chamber, which has the piston inside. The purpose of the second chamber is to return the oil to the underside of the piston on the compression stroke, or top side of the piston on the rebound stroke once it has passed through the relevant separate damper. Removing any damping effect caused by uneven pressure on either side of the piston gives massively improved damping consistency.
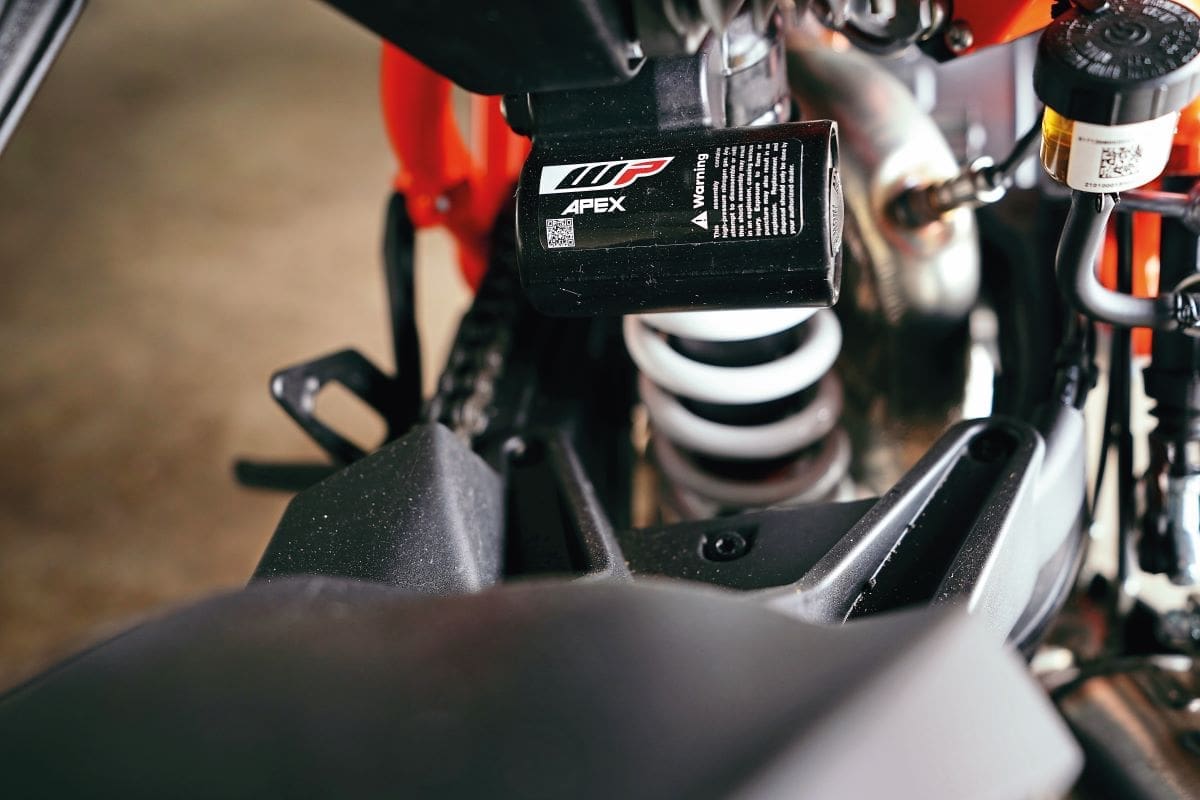
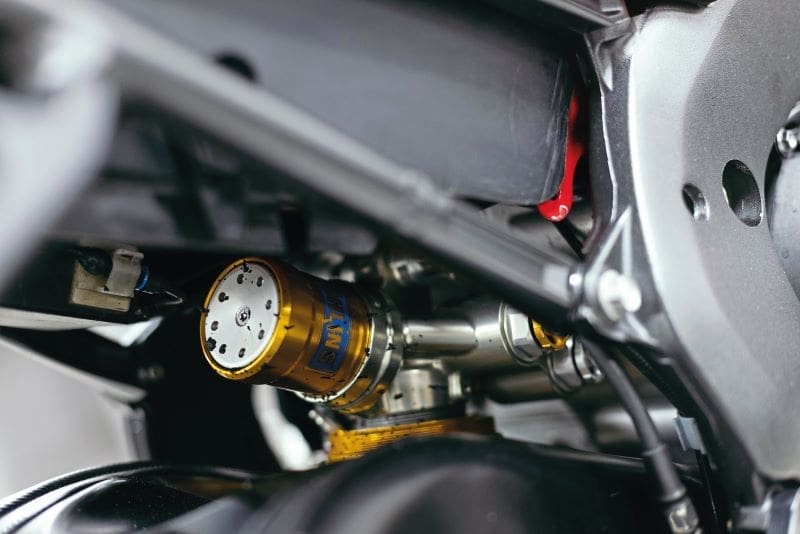
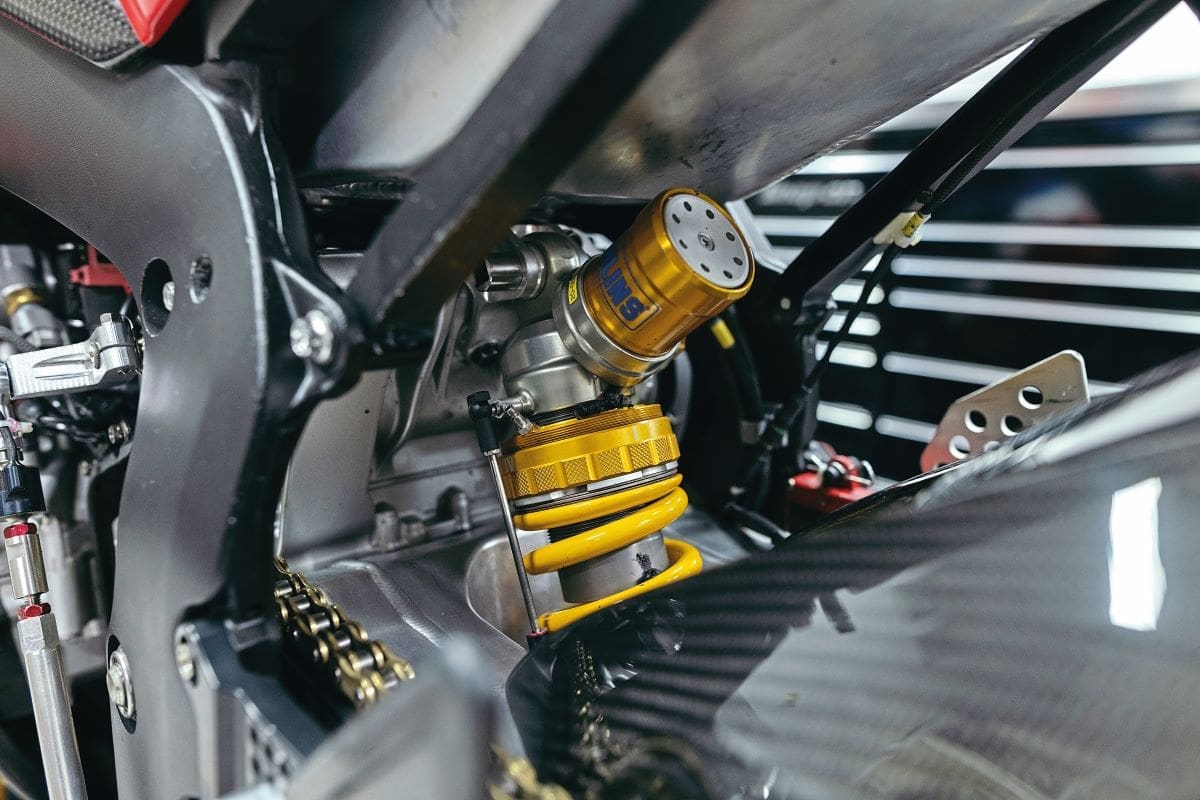
The twin tube concept isn’t anything new or revolutionary; it’s been around for ages in the car world, but is relatively new to the motorcycling scene, so is mostly found in premium shock absorbers such as Öhlins TTX, Showa BFRC, WP Apex Pro and K-Techs DDS Pro. The tell-tale sign of a twin tube shock absorber is that it usually has quite a large diameter on account of having an extra tube outside the main chamber, both rebound and compression damping adjusters will be next to each other at the same end of the shock (usually the top), and they’ll have a gas reservoir next to them that’s charged with high-pressure gas, which keeps the oil under pressure at the dampers to prevent aeration of the oil.
Very new technology that’s just appearing is through-rod, a hybrid of both designs. It’s so new that rightly so, K-Tech, which seems to be the main pioneers of it, are still quite tight-lipped about specific details, but the principle is that it uses the twin tube approach, plus a shim stack on a much bigger piston. The key benefits seem to be much greater consistency when it gets hotter and a faster reaction time when changing direction from the compression stroke to the rebound stroke.
There are so many variables when it comes to just the rear shock – obviously the key component in the whole rear set-up – but there are other factors that have an impact on how the shock can perform. Simply changing the rear sprocket will change the distance between the rear wheel spindle and swingarm pivot, which alters the amount of leverage on the linkage, which in turn throws out all the settings. A bigger rear sprocket will result in a shorter swingarm length that will stiffen the rear, and soften if a smaller rear sprocket is used. This is why you’ll see race teams go to the trouble of adding or removing links to the chain in order to maintain the same swingarm length if a gearing change has been made, and, of course, the need to maintain the overall wheelbase of the chassis.
The relationship between the front sprocket, swingarm pivot and rear wheel spindle is also critical. The manufacturer of the bike has done the sums already, but if you’re building a special or fitting an engine into a chassis that it wasn’t originally designed to be in, you must check this three-way relationship. Get it wrong and you can find yourself in a situation where, at either or both extremities of the swingarm’s range of movement, the chain can tighten to the point where it slows down the rate of movement of the swingarm/wheel, effectively dumping a load of compression damping into the mix at a certain point. It also means the chain becomes extremely tight in that scenario, which is no good, and if it does, it means that at the other end of the range of movement – for example, the rear is off the ground during a jump – the chain can be so loose that it jumps off the sprocket, which, while not specifically related to the topic at hand, is worth a mention.
The rear suspension of a bike is so much more than just a rear shock, and while there’s no doubt that having a posh aftermarket shock in your bike will make every aspect of its handling better by virtue of being made to tighter tolerance and using higher-grade materials and oil, there are other factors in play that affect the way a bike feels, right down to the chain tension.
However, by far the biggest influence on it is you having the basic understanding of the principles of what’s going on, and taking the time to adjust and maintain everything that is part of the rear suspension to be as good as it can be. The rewards are massive.